There’s a reason you need to break-in your new dirtbike properly…
Does this sound familiar? A truck pulls into the parking area of your favorite riding spot, and there are a few bikes in the back. One of the bikes is absolutely, utterly brand new. Oh sure, it was probably started up in a dealer’s showroom, just to make sure it ran. The owner of the new toy just can’t wait to get going and damn near falls all over himself getting the bike unloaded and putting his riding gear on. His buddy just stares at him wishing he had a new bike, too.
Two kicks later, the bike fires up and the rider blips the throttle a few times, then puts the bike into gear and blazes off into the distance. Sometime later, you see the bike being towed back into the parking area by his buddy. The guy is genuinely furious and doesn’t hold back on the cursing.
The reason that things like this happen so frequently is that most people think a dirt bike is like a new car. It shouldn’t break when new. But the opposite is often true. New bikes break more often than old bikes mostly because they are not prepared properly.
Before a dealer delivers a new bike to a customer, he’ll put it together, maybe check the oil level, possibly time the ignition, and run the bike for a few minutes. That’s it. After that, it’s your bike. Some dealers do a much better job than the one above, but that’s the usual drill from the usual dealer to the usual bike. It’s really up to you, the bike’s new owner, to do the kind of work necessary to make a new dirtbike reliable.
BUY IT IN THE CRATE?
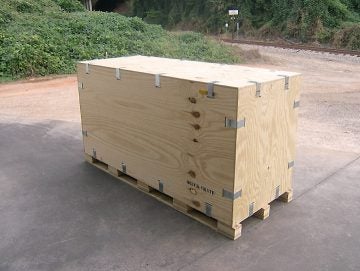
First off, it’s not necessary to have the bike set up by a dealer. If the buyer does his own work, he would probably benefit from the experience gained in assembling the bike, and he might even get a discount for doing so. Most new bikes come to the dealer in a crate, some have the forks mounted, and some don’t. But there is no mysterious ritual that this dealer performs to get the bike uncrated and running. Don’t even think about buying a new bike in the crate unless you’re at least a halfway decent mechanic, though. Also, don’t buy the bike in the crate if the warranty demands that the machine must be set up by an authorized dealer.
If you do choose to buy the bike in a crate, first you’ve got to remove it from the crate. Easy? Maybe not. Some of the European bikes come in a fancy crate and the crate is made of real hard wood. Take it easy with the screwdrivers and hammers, because some of these cool crates make good storage cases, or work tables when you’re done with them.
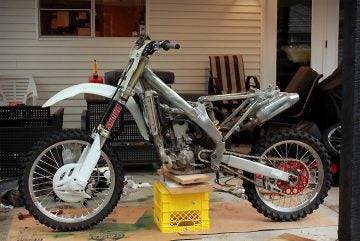
Once the bike is free from the crate, put the machine up on a work stand or a good strong milk crate. If the forks are already mounted, check the bearings for play by rotating the forks lock to lock. If they feel slightly stiff, don’t worry about it. New parts are always stiff. Tighten up the bearing retainer if they are too loose. This is actually unlikely, so double check before applying any amount of torque; the bearing should be greased adequately at the factory.
If the forks are not mounted, here is how to do it. Put the triple clamps into the frame in the steering head with Marine grease. The bearings should be in a little bag someone near the bottom race. When all the bearings are in place, wipe off the race to get rid of any metal shavings until the bearings are nestled comfortably between the race in the frame and the one in on the forks.
Get a friend to hold the forks up in place and put the top bearings in the race. Then tighten the bearing retainer finger tight. Slowly tighten the bearing retainer with a wrench while turning the forks to lock to lock. When the forks feel like they are binding, stop. Now back off the retainer slightly until the forks rotate freely. Tap the top triple clamp in place with a soft mallet and tighten them after a local application of Loctite or similar locking liquid.
CHECK EVERYTHING
Before we go any further, think about oils a little bit. I know it’s not a lot of fun or very interesting, but you have to consider that most of the countries that produce bikes don’t really have any kind of oil in their own land. This means they have to buy the oil and more often than not, it’s usually the cheapest oil that they can get. There are some high quality manufacturers that use good oil in their assembly, but most do not. As the owner of the new bike, you have two options: Either bring up all the fish oil before riding the bike, or leave the oil in for a couple of rides and let it act like a break-in oil. This goes for fork oil, gearbox oil, and in some cases, rear shock fluid.
Forks first. Find the drain plug on the bottom of each fork leg and drain the oil out. We assume at this point that you have a factory manual with the bike, so refer to the manual to show how much oil you should put in each fork leg. A low-cost baby milk bottle is a handy thing to have at this point. It’ll have both cc and fluid ounce graduations marked on it, and makes an excellent measuring device; chop off half the nipple and it becomes a ready-made fork filler.
Use the recommended fork oil weight as per your manual. Later on, if you want to dabble with the forks a bit, lighter oil will give you a softer ride and a heavier oil makes for a firmer ride. After oiling the forks, install and tighten the large fork tube nuts. Then tighten the pinch bolts on both of the triple clamps.
A few quick words on fork seals. Some machines come from the factory with a poor fork seals, the worst offenders seem to be on European bikes, but some of them will come with decent seals. Whether you change the seals or not when the bike is new, is entirely up to you. Most folks don’t, because they always keep a glimmer of hope alive that their bike seals will be okay. When it is time to change the seals, don’t replace them with the factory replacement seal. Go to a Honda dealer and he’ll be able to match up some seals for your forks.
After this, go through everything on the front end: fender, wheel, brake cable, stay arm, etc. Don’t let a nut or bolt go together without Loctite or some sort of weather stripping cement. This is important! All the bolts that are already tightened at the factory must be taken apart and given the anti-vibration treatment. Mount the handlebars and levers, positioning them where they are most comfortable for you. Next, mount all the rest of the bits and pieces.
DON’T STOP NOW
At this point, the bike should be completely assembled. Next, check the frame. Every nut and bolt on the bike must be vibration proofed by using one of the mentioned substances like Loctite. Take the nuts and bolts all the way apart, spray them off with a plug cleaner, let it dry, apply and reassemble. This is boring, time-consuming, and a real drag. You’re anxious to go riding, but do it. A nut and bolt in hand are worth two in the sand wash.
Don’t forget the nuts and bolts holding the exhaust on. These are very susceptible to vibration. Also, take the time to remove the gas tank and seat to get all the bolts under them. Most ignition coils are mounted under the tank. Double and triple check them. To get really trick, remount the coil with rubber grommets to kill some of the vibration.
While the saddle is off, check the air filter to make sure that the foam is properly oiled. If the air cleaner fastener or the airbox nuts falls off, it’s liable to enter the carburetor or throttle body, then the engine… And then you’ve got real problems.
Adjust the chain and lube it. Check all the spokes for tightness. Snug up the rim locks. Adjust the rear brake rod or cable. Then adjust the tire pressure. About 15 pounds usually works the rear; 13 pounds up front is pretty good starting point.
Turn your attention to the motor. Connect the torque wrench to the head bolts and then take them to the specified value; this is very important on higher RPM bikes and a good idea on all other bikes. Don’t bother with Loctite on head bolts. They get hot and expand and are self-tightening.
Check all the connections on and around the carburetor or throttle body, paying particular attention to the top of the slide chamber in the air cleaner boots. Twist the throttle a few times to satisfy yourself that the slide is working properly and returning all the way to the bottom. Listen for the clicking sound it should make.
Lean the bike over on its side gently and inspect the tightness on the gearbox and crankcase drain plugs. While you’re down there, give the motor mounts a proper tightening. While you’re at it, check the gearbox level.
STARTING TIME
Gas the bike up with high test, as it runs cooler than regular. If your new bike is a two-stroke, make your gas/oil mixture. If you’re not sure what to use, try 32 to 1, which we’ve used for years successfully. Start it up and let it warm up completely before riding it an inch. You might have to make a few minor adjustments on the bike, such as idle speed, idle mixture and so forth.
While you’re breaking in the bike, don’t force it to work hard at low rpm or rev high in the rpm range. Do this for three or four tanks full of gas and the bike should be considered broken-in. Don’t cheat on this. If you do so you will pay the price with badly worn rings and other parts.
BREAK-IN TIPS
1. Don’t let the engine lug in a taller gear for more than a few seconds at a time.
2. Don’t climb any long or steep hills, or ride in deep sand more than a few hundred feet.
3. Let the engine cool frequently, especially at first.
4. No sustained higher rpm running, but short bursts are okay.
5. You can get more liberal with the throttle after a tank is run through the motor, but really take it easy the first day.
As you have probably figured out by now, the object of all this is keep the engine from overheating. Letting the engine cool frequently promotes a lot of expansion and contraction, which is good for a tight fresh engine. After the first couple of rides, drain and replace the gearbox oil. After the first couple times out, replace the fork oil. These items are also breaking in. Flushing is needed to get the metal particles away from those horribly expensive bearings.
Check the spark frequently when the bike is new; it will almost certainly be necessary to rejet or at least change the needle setting. Keep on top of the jetting. Lean engines will overheat. If in doubt, go rich. Tighten everything as the machine breaks in. Look for troublesome parts that resist every attempt to keep them on; they may have to be safety wired. The chain will have to be adjusted frequently when the bike is new.
Keep it tight.
After familiarizing himself with his new bike, a rider will find that there are some things that he needs to change to make the bike fit his style.
You might like a certain kind of bar, or be happier with smaller grips. Don’t hesitate to ask someone who bought a bike like yours what he did to it. These are the kinds of things that you might find out way ahead of time.
 Your Privacy Choices