With many parts of North America already in the throes of cold winter weather, adding grip heaters to your off-road or dual-sport motorcycle can provide some welcome warmth to your hands if you refuse to let Old Man Winter stop you from riding.
I’ll walk you through the installation process, adding a sprinkling of enhancements and tips that will significantly improve the end result without adding a lot to the cost. Of course, the best time to do this project is before the mercury falls. But the increased comfort during frosty rides will make the effort required worthwhile, even if you’re already deep into winter. Warm hands are much better able to operate controls, and they help us feel less frozen elsewhere.
I’ve had good results with Symtec’s Heat Demon grip heaters and Oxford’s Heaterz heated grips. I’ll use these products for demonstration, though the same principles apply when installing most alternatives. Remember, it’s wise to disconnect the ground (negative) wire from your battery before doing any electrical work on your bike.
Grip Heaters
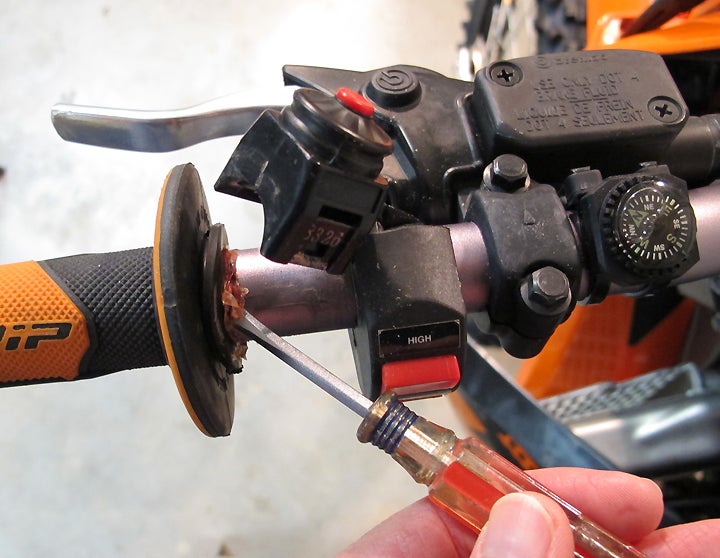
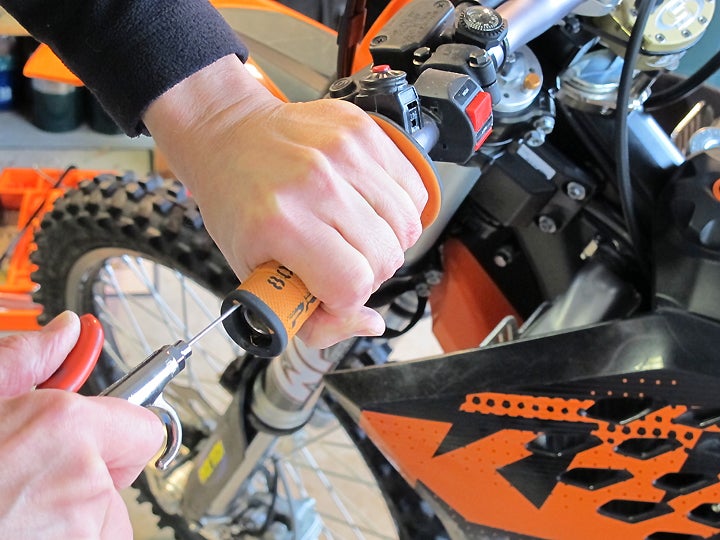
First, out with the old; you’ll have to remove your existing grips. Since you’re not taking them off because they’re worn out, you might want to re-use them. This may be especially true if you’ll need two throttle-side grips (see further below) and don’t want to have to purchase two new sets of grips to get them. I prefer the elegantly simple and highly effective method of using compressed air to break the adhesive bond and stretch the grip away from the bar. Use the needle attachment for your air gun (the one you’d use to pump up a ball). Slip it under the grip’s outer edge and pull the trigger. Rotate and pull on the grip as the air pressure works its magic. Voila! Your grip will slide off quickly without damage. Obviously, this hack only works with open-ended grips; others may have to be cut off and discarded.
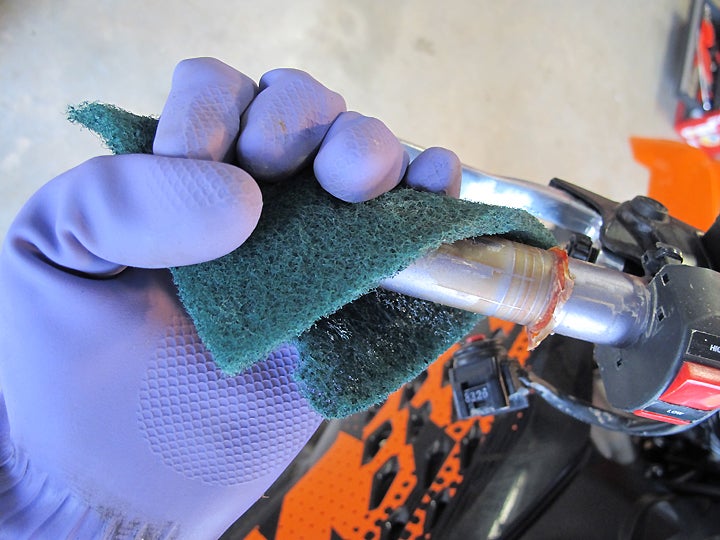
Remove any adhesive residue on the bar; same goes for your throttle tube. I like to do this with Scotchbrite and acetone, though a different solvent (e.g. contact cleaner or alcohol) may work better in some cases. If your throttle tube has ridges to secure the stock grip, these will have to be cut/filed/sanded down so you’re left with a smooth, clean, unadorned tube around which to wrap the heating element. This is a good time to slip the throttle assembly off the bar and remove accumulated gunk from the tube’s interior and the handlebar proper.
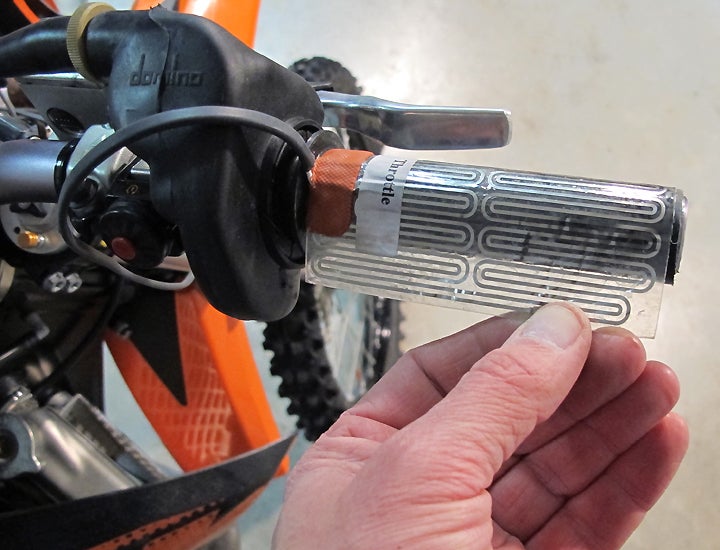
Remember that the throttle tube must be able to rotate freely throughout its full range. Also consider where the elements will leave a gap if they don’t reach all the way around. If possible, put that gap between where your fingertips end and the heel of your hand begins when positioned normally on the grip. Now remove the protective film and carefully wrap the element around the tube. Avoid making air pockets or wrinkles.
For steel handlebars, installation is the same on the clutch side. If you have an aluminum bar, seriously consider the following modification. Because aluminum is especially good at conducting heat (notice the heavy aluminum disks that distribute heat evenly on the bottoms of some cookware), it makes sense to put insulation between the heating element and an aluminum bar. Otherwise, the bar will transfer heat away from the element and leave your clutch-side cooler than your throttle-side. (This may also happen with a steel bar if your heaters don’t have side-specific elements.)
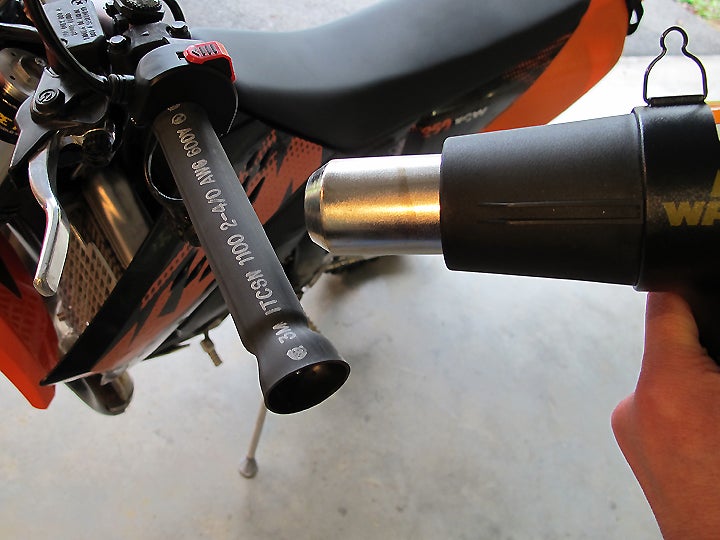
For about five bucks, you can get adhesive-lined, heavy-wall, heat-shrink tubing from an auto parts, hardware or electrical supply store in a size slightly larger than your handlebar diameter (e.g. 1” diameter tubing for a 7/8” bar). Slip this onto your bar enough to shield the entire length where your grip will reside, then apply heat evenly with a heat gun or hair dryer until the tubing has shrunk neatly and snugly against the bar throughout its length. Make sure the tubing’s adhesive has been activated with adequate heat. Once cooled, you should not be able to rotate it. Trim the excess off at the bar’s end. Because such tubing can shrink a bit lengthwise when heated, make sure you keep the inboard edge lined up with where the grip will eventually reside.
The heat-shrink tubing will provide an insulated mounting surface for the clutch-side heating element. However, you probably won’t be able to use the normal clutch-side handgrip because you’ll have increased the effective diameter of the handlebar. You’ll likely need a second throttle-side grip, which will have a larger internal diameter, meant to accommodate the throttle tube. Some folks use electrical tape or duct tape here instead of heat-shrink tubing; this may work for a while, but the tape’s adhesive could eventually become gooey and lose its grip when repeatedly warmed by the heating element.
Note: It’s not only handgrips that can be reused. I know of multiple cases wherein grip heaters were carefully peeled off and remounted, either using fresh adhesive (pick one that’s heat resistant) or–if enough is left on the element–reusing the original adhesive. What’s pictured is actually a re-installation of grip heaters previously used on a different bike. The clutch side got fresh 3M hi-temp spray adhesive, while the throttle side did just fine without any refreshing–even after a year of sitting uninstalled.
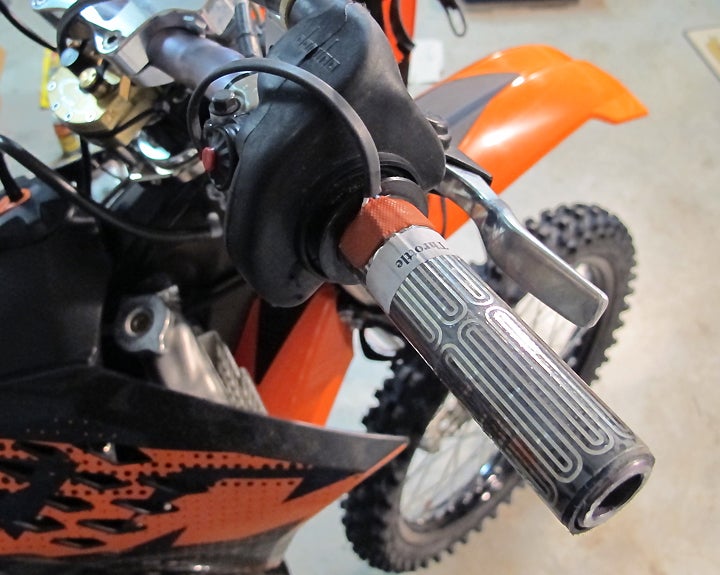
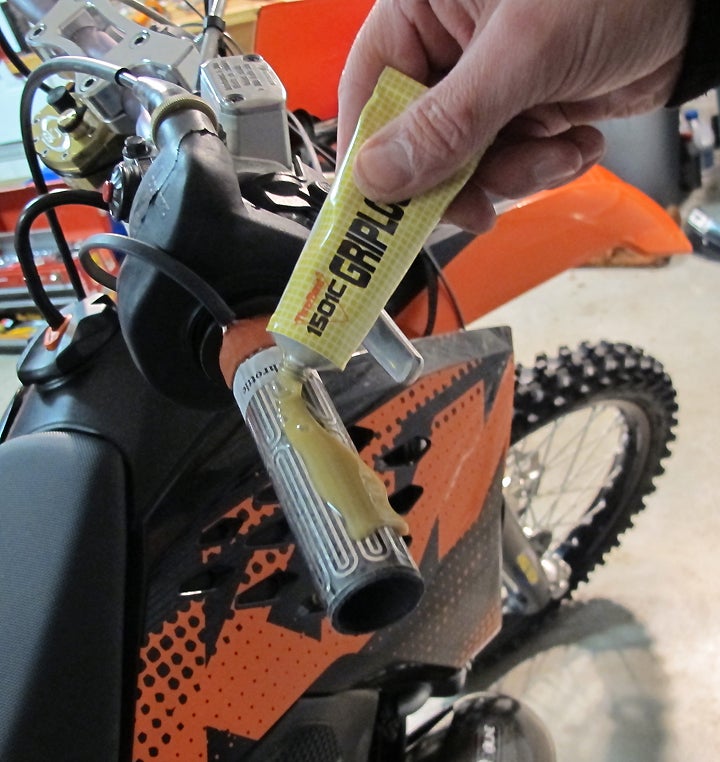
With the heating elements in place, you’re ready to slip handgrips over them. There are many preferences among riders regarding how to best secure a set of grips in a standard installation, ranging from the use of hairspray, paint, or contact cleaner, to various brands of grip cement. For securing grips to heating elements, we recommend using a premium grip glue, such as the Three Bond Grip Lock pictured. It’s slippery enough at first to allow the grips to glide across the extra girth of the element, and its bond isn’t quickly broken down by repeated heat cycles.
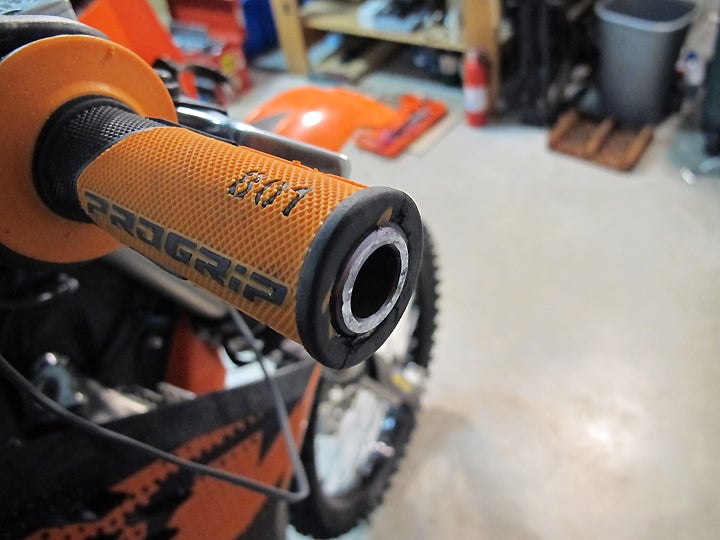
As with any grip installation, take pains to avoid getting adhesive between the throttle tube and the handlebar inside it. Generally, this can be accomplished by applying glue only to the outside of the tube, and not the inside of the grip. Repeatedly stretch/lift the grip over the glue and twist it as you work it over the element; this will distribute the glue evenly. As a further safeguard, I like to temporarily secure the throttle assembly with its end several inches off the bar’s end, so any glue that might enter the tube can be easily wiped out before it contacts the bar.
I value safety-wire as added insurance against grip slip in standard installations, and I show it being used here with grip heaters. Some people think safety wiring grips is a means of tightening them down against the bar, increasing the friction that holds them still. Actually, when done properly, it simply seals moisture out of the grip’s interior. This guards against premature failure of whatever adhesive might be used, and it prevents water from sneaking in and lubricating the bar/grip interface. The point here is that safety-wire doesn’t have to be cinched down hard–it could easily slice the grip and defeat the whole purpose.
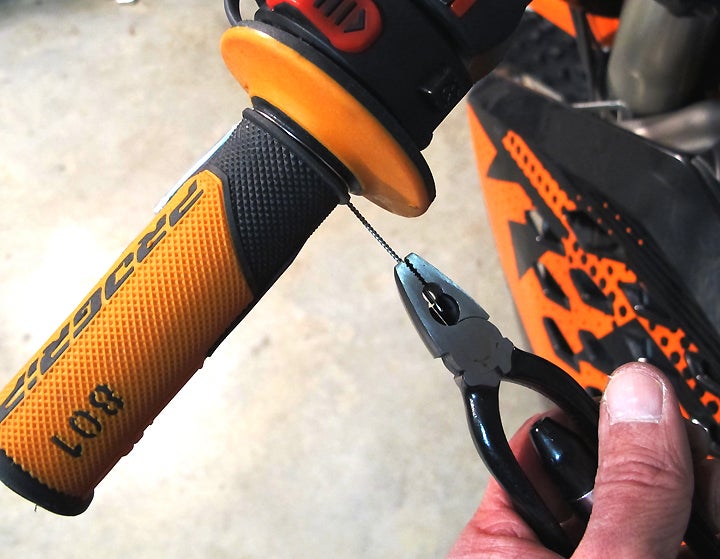
This is important because you may read a warning against using safety-wire on grips mounted atop heating elements. While there’s no reason properly installed safety-wire should present any hazard, safety-wire that’s been tightened excessively could cut through the grip, and (at least theoretically) either become superheated by the element or short out the electrical circuit involved. So, tighten it only to the point that it creates a slight indentation in the grip surface.
Now, about those electrical circuits…
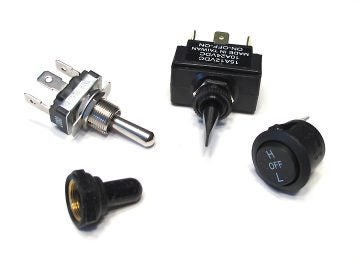
With the heating elements and grips finished, you now have to give them power–and give yourself the power to control them. So, first tidy up your installation by zip-tying those wires from the elements along your handlebars. Their ends will need to be connected to a switch so you can turn them on and off, and adjust their heat output. Typically, grip heaters come with cheap three-way (hi-off-lo) switches with questionable weather-proofing and the requirement of cutting a mounting hole in a panel somewhere.
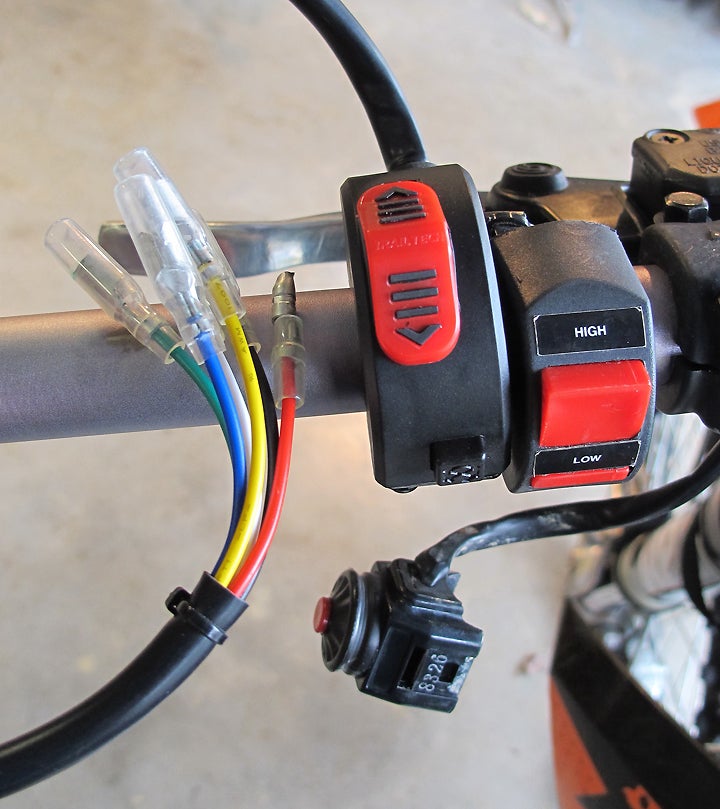
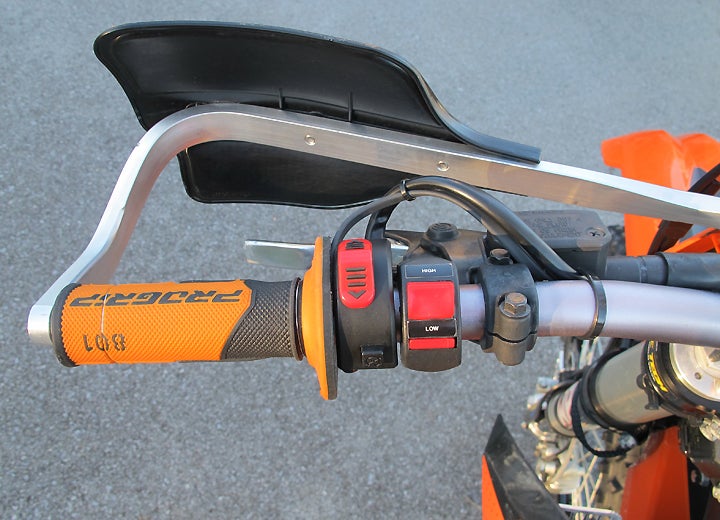
Fortunately, Trail Tech makes a wonderfully sano solution: a tough handlebar-mounted three-position switch that also incorporates a kill-button ($29.95). While this item is clearly designed for use on a dirt bike, it’ll work fine on dual-sport and ADV machinery with street-style switchgear, as long as there’s room for it on the bar. Such installations just won’t utilize the kill-button.
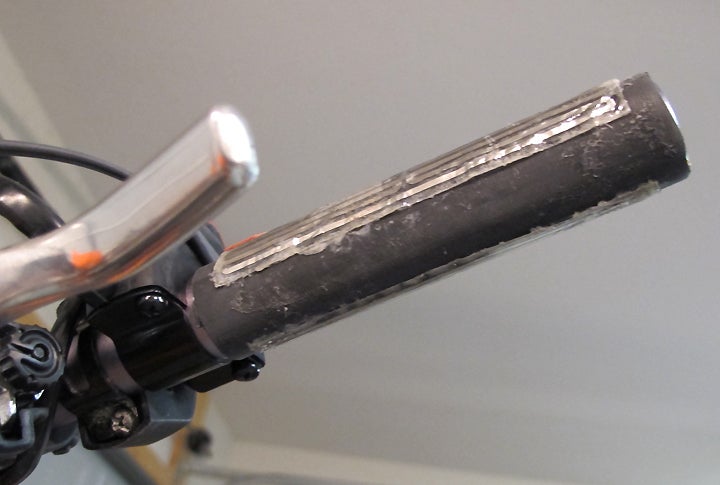
Whether you’re using the Trail Tech unit or the switch that came with the heating elements, identify the switch-to-element connections, which will be different for resistor-type and resistor-less setups. Resistor-types utilize a ceramic ballast resistor to create their low-heat circuit. This resistor bleeds off power (in the form of heat), reducing the heat generated by the grips. Resistor-less grip heaters actually have two heating sub-elements within each element to create high- and low-heat circuits. Compare the thin serpentine metallic areas in the resistor-less elements shown in the installation photos to their wider, but less numerous, counterparts in the resistor-type (Kimpex brand) elements in this article’s title shot.
So, switches on resistor-type setups will have a single power line out to the elements (eventually branching off to each side) and two power lines in to the switch (one of which will contain the resistor). Resistor-less setups will have a single power line in to the switch, and two power lines out to the elements (for their high and low sub-elements), both of which will branch off to each side. This sounds more complicated than it really is, especially when you have only your setup in front of you.
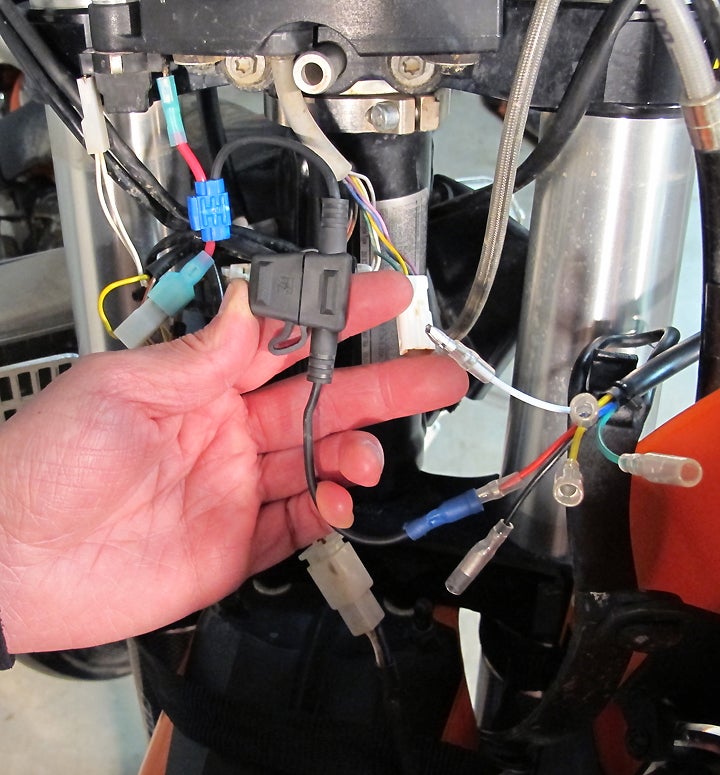
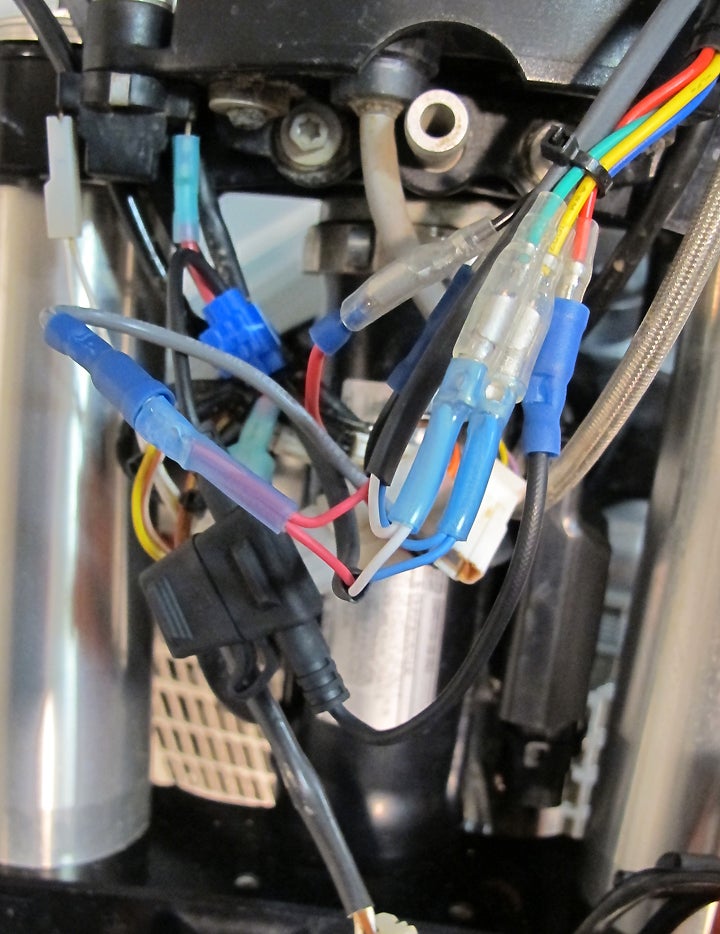
Bundle or cut the element wires so that their ends are near the switch connections; leave enough slack for full handlebar range of motion. If the wires aren’t already wearing the appropriate connectors, crimp or solder some on. They’re inexpensive and available from any hardware, electrical supply or auto parts store. Make sure to select the right size and gender spade or post (a.k.a. “butt”) connectors.
Next, connect the element power wires to the switch according to the instructions supplied with each. If your heating elements did not come with an inline fuse, consider adding one. A weather-proof fuse holder only costs a few bucks, and may save you from the dangers of short circuits and excessive current. Simply insert it between the 12v power supply and the switch. On resistor-type setups, this means power will initially travel through a single fused line before branching into the resistor-less and resistor-equipped sections that then connect to the switch. A 5-amp fuse will suffice, given that heating elements should only use around 3-4 amps on their high setting.
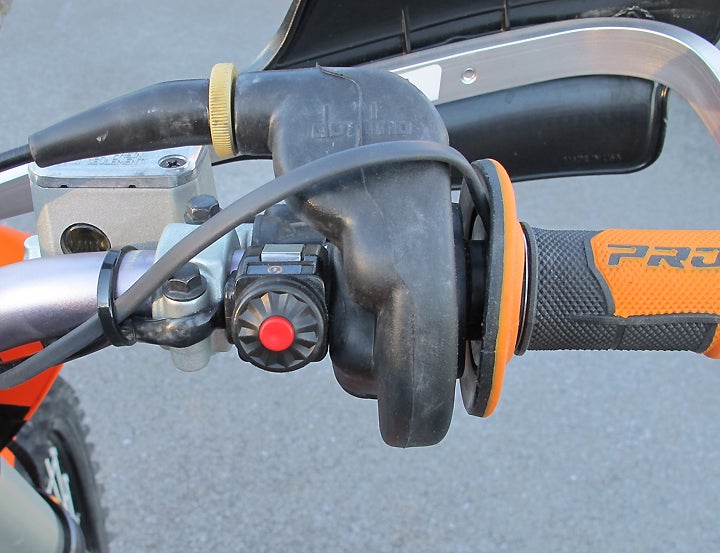
If you use the switch that came with the heating elements, you’ll have to find a place to mount it. A flat section of plastic out of harm’s way, but also easy to access with gloves, is what you need. There will have to be enough room behind/underneath your chosen location to fit the switch-box and its connecting wires. On a dirt bike, this might be a side of the headlight mask. On an Adventure bike, an inner panel of the fairing assembly is probably best. Drill a hole the same size as the switch’s threaded section, poke the switch through from behind/underneath, and cinch down the switch’s locking nut.
If your grip heaters are resistor-type, a place must be found to put the resistor, keeping in mind that it will get very hot. In many cases, mounting it on the triple clamp is a good solution. Secure it with hi-temp silicone sealer away from plastic and rubber parts, watching out for wires, cables and hoses that could come close at certain handlebar positions.
Use a battery charger to make sure that your grips and switch behave correctly before you hook them up to the bike’s power. This way, any problems with your accessories won’t get confused with a problem in your connections to the motorcycle, or the motorcycle’s electrical system. Simply clamp or fasten the charger’s positive and negative wires to those from your assembly thus far and turn on the switch. You should feel them starting to warm in the first minute or so.
Assuming your test was successful, the element ground wires can now be connected to a convenient fastener that screws directly into the frame. In general, power to the switch should come from a regulated 12v wire, so that the heating elements receive a steady stream of current. I’ve heard of grips melting with unregulated power, but I’ve also heard of elements generating insufficient heat with regulated power. Having never encountered either of these situations ourselves, we’re not sure what to make of such accounts, so we’re only going to recommend using a regulated line.
If you have accessory terminals handy, these can be used to access both power and ground. If not, you’ll have to tap into a “hot” wire nearby, such as one used to power your headlamp. Depending on the strength of your bike’s charging system, it’s possible that such an arrangement may dim your headlamp a bit, in which case you may not be able to use your grip heaters at night. To avoid any possibility of leaving your grip heaters powered on after a ride–and draining your battery–use a power source that is switched on and off by your ignition key, if you have one. Although the dirtbike shown has no ignition key, the wire to its headlight is only powered while the bike is running, so the grip heaters cannot be left on accidentally.
If you use the Trail Tech switch on a dirt bike, you’ll probably want to take advantage of its integrated kill-button. You can either cut the stocker’s wires and reconnect them to the Trail Tech switch, or remove the entire stock kill-button assembly intact, and run new wires to its original coil and ground connections (so you can restore the stock setup later). Likewise, if you’re tapping into a power line, you can either use a piggyback connector that will cut into an existing wire, or insert a short section of wire between two existing connectors in the power circuit. This new section can either be tapped with a piggyback connector, or you can insert it along with the switch’s power source wire into one of the new connectors. To return your bike to stock, this new section is simply removed and the original connection restored.
Zip-tie excess wire and secure bundles where they won’t get pinched or push something else into a problematic position when everything is buttoned up. Reconnect your battery and go for a ride to confirm that your new grips warm up properly using your bike’s power.
Heated Grips
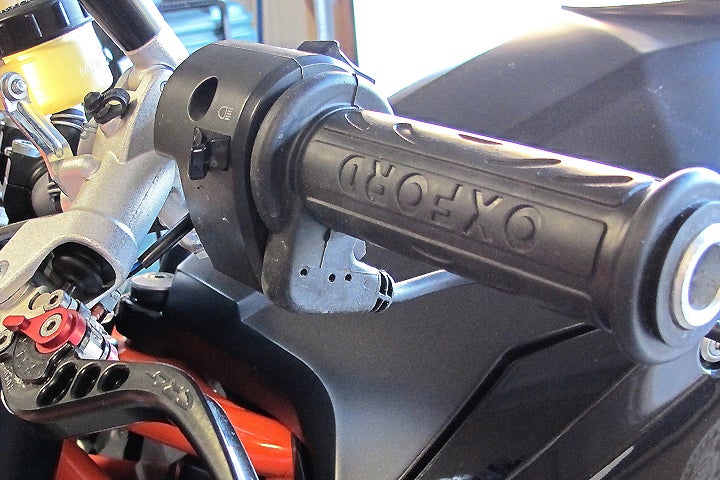
Unlike grip heaters, which are one-size-fits-all, heated grips must be purchased in the size appropriate to your handlebar, with attention to both its thickness (7/8ths or 1 inch) and the length of bar space available. Take measurements and contact suppliers/manufacturers to ensure compatibility. Although this article shows a street bike with street-style heated grips, the installation procedure is no different for off-road-capable motorcycles, and Oxford makes an Adventure model of their Heaterz with more aggressive textures for better grip in slimy condidtions.
Much of the procedure above applies equally to heated handgrips. Some things are simplified, since heating elements and grips aren’t installed separately. However, the Oxford Heaterz shown here added some challenges of their own. First, they were an extremely tight fit. This was compounded by the presence of excess rubber that had seeped into the grips’ interiors during the manufacturing process (just as when a gap between two adjacent mold edges allows molten material to squeeze through before it solidifies). Trimming away this excess rubber proved surprisingly difficult and frustrating, and required lots of awkward filing against the incredibly resilient rubber. This slop should have been removed by the manufacturer! In contrast, it was very easy to trim a little off the grips’ outer ends to fit the available length on the bar. Make sure to consult the instructions to avoid cutting into the embedded heating elements on any heated grips you need to shorten.
Secondly, even after removing the offending interior rubber and sanding down the surprisingly thick layer of paint on the handlebar to maximize clearance, it was still very difficult to get the grips in place before the supplied super-glue started grabbing (which, of course, only made the process harder). I highly recommend sliding these grips into place “dry” a couple times to give yourself some practice, and to make sure you don’t encounter any unexpected obstructions. While extremely tight, their interiors are actually hard plastic tubes with a lengthwise slit (where that excess rubber seeped through) that allows for a little expansion, so they can be pushed on and pulled off without any lubricant, unlike plain rubber grips. Remember that super-glue bonds skin quite effectively–and fast!–so use caution; also cover any parts of the bike onto which it might drip during installation.
Extra challenge number three: our Heaterz’s controller did not operate properly. It turned on and off, but would only cycle through its four settings in one direction, from low to high, and one of its LED’s didn’t light. Selecting a lower setting required turning them off and starting over in the sequence. It was also completely impossible to see the tiny lit LED indicators in bright sunlight.
The replacement set of Heaterz I tried didn’t work at all–at least so it seemed. After lots of detective work, I discovered that the fuse in their (built-in) inline fuse holder was not transmitting current, even though it appeared to be intact. Always try a replacement fuse before looking further; it could save you hours of unnecessary frustration! With a fresh fuse, the replacement Heaterz functioned properly.
Finally, while the Heaterz come with nice quick-connect plugs at all wiring junctions (including a multi-pin DIN connector), these don’t allow easy trimming of the wires to custom lengths. In my case, I ended up with a great deal of bulky cable to cram into the extremely limited space in my test bike’s headlight nacelle. If you run the included wiring all the way to your bike’s battery, the length will probably not be a problem. But if you use wire taps or accessory terminals up near the bars, you’ll have to stow a lot of thick, stiff cable.
Note: Oxford recommends that Heaterz be wired directly to the battery to ensure that they receive adequate current and do not compromise some other circuit. I’ve encountered no problems using the switched accessory terminals on a bike that doesn’t have an especially powerful charging system or battery. I’d expect most users to be able to do the same. If you do connect directly to the battery, you run the risk of leaving the Heaterz on at the end of your ride, or having someone else turn them on while your bike is parked in a public place. Although they have a built-in cut-off mechanism that shuts them down when it detects low voltage (10.5-11.0 volts), a battery drained to that level may not have adequate power to start your bike, especially if it’s a twin such as a KTM Adventure model.
Whereas grip heaters have relatively thin, flexible wires exiting them, heated grips have much bulkier and stiffer molded rubber “towers” that contain their exiting wires. These may allow fewer options for placement. I found pointing the tower down (slightly below the plane of the clutch lever) worked best on the left, and pointing it almost straight forward (above the plane of the brake lever) worked best on the right. On my test bike, this arrangement allowed unencumbered use of the front brake and free movement of the throttle, but other machines may require different setups.
The Heaterz’s control switch can be mounted in different ways. It comes with a small bracket that can easily be attached to the two-bolt clutch perch on many bikes, using the included assortment of bolts and spacers. My test bike, however, had a one-bolt clutch perch that didn’t allow this. I could have used the included adhesive pad at my chosen mounting location at the forward edge of the gas tank, but I wanted to be able to easily remove the switch (and all the associated wiring) during warm seasons. So I used some strong hook-and-loop patches to affix it. Other bikes would offer other mounting options.
So which is best?
This is a matter of personal preference and will involve bike-specific considerations. There isn’t much difference in actual heating performance, at least between the grip heaters and Oxford Heaterz heated grips I’ve used.
Riders with smaller hands may not like the rather thick diameter typical of heated grips, and riders with any size hands may have favorite grips they don’t want to give up. In either case, grip heaters are likely to be the better option. Grip heaters are also more economical (at least before you start substituting switchgear) and take up less space because their spare wiring is easily cut to fit and doesn’t have to be bundled. Resistor-type grip heaters are the most common and least expensive, but mounting their hot resistors presents an extra installation challenge.
Heated grips, at least theoretically, offer streamlined plug-and-play installation, and might deliver a more aesthetically pleasing, factory-installed appearance than grip heaters. (However, on the bikes shown, with the chosen switchgear options, I’d say the opposite was true.) If very thick grips are used with grip heaters, they may deliver less warmth to the rider’s hands than the Oxford Heaterz did, so those who prefer thick grips may get better performance from the Heaterz. The controller included with most heated grips will have more settings than just high and low, although an infinitely variable dial-type controller (referred to as a “heat-troller”) can be substituted for the switchgear on heated grips or grip heaters, albeit at considerable expense ($60-70). There are even dual-dial units that allow for independent adjustment of each grip’s heating element.
Either way you choose to go, adding the option of heat to keep your fingers warm and toasty during cold rides is well worth the effort. Your hands will thank you for making the mod.
Resources:
Aerostich/Riderwearhouse
8 South 18th Ave. W.
Duluth, MN 55806
800-222-1994
www.aerostich.com
Heat Demon
124 Osborne Road NE
Fridley, MN 55432
763-571-9193
www.heatdemon.com
LockItt Group, Inc.
370 Butler Bridge Rd
Unit C
Fletcher, NC 28732
828-687-9956
www.lockitt.com
Oxford Products USA, Inc.
4815 Executive Park Court
Suite 105
Jacksonville, FL 32216
855-341-0076
www.oxford-products.com/us
Trail Tech
1600 SE 18th Ave.
Battle Ground, WA 98604
360-687-4530
www.trailtech.net
 Your Privacy Choices